The key to extending the UK growing season isn’t fighting the weather with more plastic, but intelligently designing energy-efficient micro-systems on your land.
- Managing thermal mass and air drainage has a greater impact on overnight temperatures than simple insulation.
- Strategic planting and permaculture zoning can dramatically reduce labour costs while increasing crop resilience.
Recommendation: Start by mapping the invisible energy flows on your property—cold air, solar gain, and your own foot traffic—to identify opportunities for high-impact, low-cost improvements.
For any UK market gardener or fruit grower, the weather is a constant, unpredictable business partner. A late April frost can wipe out a season’s worth of blossom, while a cool, damp spring delays harvests and compresses the selling window. The conventional response is often one of brute force: larger polytunnels, thicker horticultural fleece, more energy-intensive heating. These solutions provide a buffer, but they treat the symptoms—low temperatures—rather than addressing the underlying system dynamics. They often lead to a cycle of increasing costs and dependencies, positioning the grower in a constant battle against the elements.
But what if the goal wasn’t to fight the weather, but to choreograph it? What if, instead of simply shielding crops, you could actively manage the flow of energy across your site? This is the core of bioclimatic design. It reframes the challenge from one of protection to one of strategic energy management. It asks not « how can I keep this plant warm? » but « how can I capture daytime heat, deflect damaging winds, and drain cold air away from my most valuable crops? » This approach leverages the inherent properties of stone, water, and even the plants themselves to create a network of stable, productive microclimates.
This article moves beyond generic advice to provide a strategic framework for season extension. We will dissect the physics of thermal mass, the aerodynamics of a well-placed hedge, and the critical mistake of trapping cold air. We will then explore how applying system-level thinking, through polyculture and permaculture zoning, can not only make your crops more resilient but also save you quantifiable hours of labour every single week. It’s time to stop working against nature and start designing with it.
To guide you through this strategic shift, this article is structured to build from individual principles to a fully integrated system. The following sections will provide a detailed roadmap for analysing your site and implementing these powerful bioclimatic techniques.
Summary: A Strategic Guide to Season Extension Microclimates
- Why Stone Walls and Water Butts Keep Polytunnels Warmer at Night?
- How to Position Hedges to Reduce Wind Chill Without Casting Shade?
- Fleece vs Polytunnels: Which Offers Better ROI for Early Potatoes?
- The Siting Mistake That Traps Cold Air and Kills Blossoms
- South-Facing Slopes: How to Maximize Solar Gain for Heat-Loving Crops?
- Row Planting vs Polyculture: Which Mimics Forest Resilience Better?
- Why High-Maintenance Crops Must Be Visible from Your Kitchen Window?
- Applying Permaculture Zoning Principles to Save 10 Hours of Farm Labor Weekly?
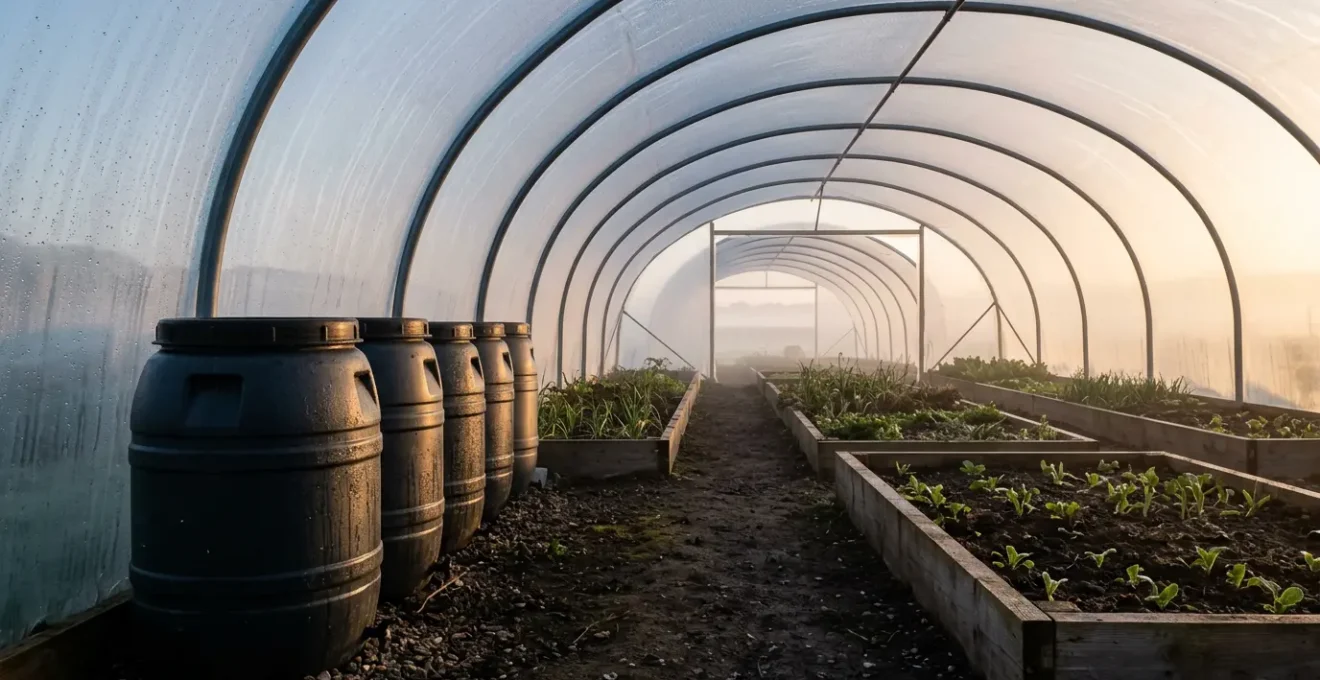
Why Stone Walls and Water Butts Keep Polytunnels Warmer at Night?
The greatest challenge in extending the UK growing season is not the lack of daytime warmth, but its rapid escape after sunset. A standard polytunnel is a superb solar collector, but it’s an equally efficient radiator, losing heat rapidly on clear, cold nights. The strategic solution is not just insulation, but the integration of thermal mass—materials that can absorb heat energy slowly during the day and release it slowly throughout the night, acting as a passive heating system.
Think of stone, brick, or large containers of water not as static objects, but as thermal batteries. During the day, as the sun heats the polytunnel, these dense materials soak up a tremendous amount of energy. A dark-painted stone wall or a series of black water butts placed along the north side of the tunnel (where they won’t cast shade on crops) are ideal for this. As the ambient air temperature plummets after dark, these thermal batteries begin to radiate their stored warmth back into the space. This process actively slows the rate of cooling, keeping the internal temperature several degrees above the outside air and protecting vulnerable plants from the sharpest frosts.
The effectiveness of this is not trivial. In fact, a UK gardener who implemented these principles demonstrated that with proper insulation and thermal mass in place, it was possible to maintain a polytunnel temperature up to 4°C warmer than the outside temperature overnight, without any active heating. This buffer is often the critical difference between survival and failure for early spring crops. The key is density and surface area: the more mass you can fit into the space without compromising growing area, the more stable your microclimate will become.
Ultimately, by integrating thermal mass, you transform a simple protective cover into a dynamic, self-regulating environment that actively works to buffer against the night’s cold.
How to Position Hedges to Reduce Wind Chill Without Casting Shade?
Wind is an invisible force that dramatically accelerates heat loss from both plants and structures. This phenomenon, known as wind chill, can make a 5°C day feel like freezing to a plant, stunting its growth and damaging tender leaves. While the immediate instinct might be to build a solid wall, a bioclimatic designer knows that a solid barrier creates destructive turbulence on its leeward side. The strategic solution is a permeable windbreak, typically a hedge, which filters and slows the wind rather than blocking it entirely.
A hedge with approximately 50% permeability is the ideal. It allows some air to pass through, which prevents the formation of high-pressure zones on the windward side and the violent eddies that form behind a solid structure. Instead, it creates a large, calm « wind shadow » where the wind speed is significantly reduced. In fact, research on UK windbreaks shows that a well-designed hedge can reduce wind speed by 50-75% for a distance of up to ten times its height.
The strategic placement of this hedge is paramount. The prevailing winds in the UK are typically from the south-west. Therefore, a primary windbreak should be positioned to intercept this vector. However, a tall, dense hedge to the south will cast long shadows, negating the benefits of solar gain. The solution is a multi-layered design. Position the main, taller hedge to the west and north of your growing area. For the southern boundary, use a shorter, more open-structured hedge or a series of deciduous shrubs that will lose their leaves in winter, allowing precious low-angle sun to reach your crops when it’s most needed.

As the illustration shows, the structure of a semi-permeable hedge is crucial. It’s the gaps between the branches that do the work, taming the wind into a gentle breeze rather than a damaging gale. This design protects crops without creating the dead, stagnant air zones that can encourage fungal diseases.
By thinking of a hedge not as a wall but as an aerodynamic filter, you can sculpt the flow of air across your land, creating sheltered zones of productivity without sacrificing sunlight.
Fleece vs Polytunnels: Which Offers Better ROI for Early Potatoes?
When aiming for the lucrative early market with a crop like potatoes, both horticultural fleece and polytunnels are common tools for season extension. However, from a strategic, return-on-investment (ROI) perspective, their suitability differs greatly depending on scale and operational capacity. A simple cost comparison is insufficient; we must analyse the full energetic cost, including materials, labour, and long-term durability.
Horticultural fleece is the low-capital option. Its initial outlay is minimal, and it can be deployed directly over planted beds to provide a few degrees of frost protection. For ‘first earlies’, this can be enough to advance the harvest by two to three weeks. The primary drawback is labour. Laying out long runs of fleece, securing it against the wind, and then removing it on warm days to prevent overheating and allow for irrigation is a time-consuming daily task. Fleece is also fragile, prone to tearing, and typically lasts only one or two seasons, making its long-term cost higher than it first appears.
A polytunnel represents a significant upfront capital investment. However, its ROI emerges through labour efficiency and superior performance. Once erected, the structure requires minimal daily management beyond ventilation. It provides more comprehensive protection from wind and heavy rain, not just frost, leading to cleaner, higher-quality tubers. The significantly warmer soil and air temperatures inside a polytunnel can advance a potato harvest by three to five weeks, a crucial advantage in the early market. Furthermore, a high-quality polytunnel cover will last 5-10 years, and the frame is a permanent asset. This longevity drastically lowers the annualised cost over the life of the structure.
For a small-scale grower with a few beds, fleece offers a viable, low-risk way to get started. For a commercial market gardener, however, the polytunnel almost always delivers a better ROI. The time saved from not having to manage fleece daily can be reallocated to other high-value tasks, and the earlier, more reliable harvest commands a premium price that quickly recoups the initial investment.
Ultimately, the decision hinges on whether you are optimising for short-term cash flow (fleece) or long-term operational efficiency and profitability (polytunnel).
The Siting Mistake That Traps Cold Air and Kills Blossoms
One of the most devastating and misunderstood phenomena in UK horticulture is the « frost pocket. » This isn’t just a random cold spot; it’s a predictable outcome of flawed bioclimatic siting. Many growers invest heavily in protective structures but place them in the one location on their property that is guaranteed to be the coldest on a clear night. This critical mistake stems from failing to visualize the movement of cold air as a fluid.
On a calm, clear night, cold air, being denser than warm air, literally flows like water down slopes and collects in the lowest-lying areas. Any solid barrier—a dense hedge, a stone wall, or even the solid base of a polytunnel—can act as a dam, trapping this descending river of cold air. An orchard or a plot of soft fruit situated at the bottom of a slope, just uphill from a solid fence, is in a high-risk zone. The trapped cold air pools around the plants, and temperatures can drop several degrees lower than on the slope just a few metres above, leading to catastrophic loss of blossoms and young fruit.

This visualization captures the essence of the problem: invisible cold air settling in a hollow, creating a zone of intense cold that damages the most delicate blossoms. The solution is twofold: avoid siting high-value, frost-sensitive crops in natural depressions, and ensure all downhill barriers have gaps to facilitate cold air drainage. A 30cm gap at the base of a fence or a more permeable, leggy base to a hedge can act as a spillway, allowing the cold air to continue its journey to the lowest point, away from your crops.
Identifying these invisible landscape features is the first step to mitigating them. It requires a systematic survey of your site’s topography and temperature variations.
Your Action Plan: Mapping Your Garden’s Frost Pockets
- Select a clear, still evening when frost is forecast. These calm conditions allow cold air to flow and settle naturally, revealing true frost pocket locations.
- Place inexpensive digital min/max thermometers at different elevations across your garden—at soil level in suspected low spots, mid-slope positions, and higher areas. Mark each location on a rough sketch.
- Record temperatures one hour after sunset, then check minimum readings the following morning. You’ll often see temperature differences of 3-5°C between high and low points.
- Note where cold air collects: hollows, bases of slopes, areas uphill from solid fences/walls. Mark these frost pockets on your garden map.
- Identify barriers trapping cold air. Creating a 30cm gap at the base of these barriers allows cold air to drain away, reducing frost severity.
Understanding and designing for cold air drainage is a fundamental principle of bioclimatic design, turning a potential disaster zone into a managed, productive space.
South-Facing Slopes: How to Maximize Solar Gain for Heat-Loving Crops?
In the UK’s light-limited climate, a south-facing slope is prime real estate for any grower. It receives the maximum amount of solar radiation throughout the day, warming the soil earlier in spring and maintaining higher temperatures through the growing season. However, simply planting on a slope is not enough. A strategic designer seeks to amplify this natural advantage by combining solar aspect with thermal mass to create a supercharged microclimate for heat-loving crops like tomatoes, peppers, and aubergines.
The key is to create a structure that both traps incoming solar energy and reflects it back onto the plants. As the Royal Horticultural Society notes, the effect of a south-facing area is emphasised if there are fences or walls to trap and reflect warmth. A stone or brick wall built along the northern edge of a south-facing terrace acts as a perfect solar collector. It absorbs heat all day and, just as importantly, reflects light and warmth onto the crops planted at its base. This creates a pocket of air that is significantly warmer than the surrounding environment.
This isn’t just a theoretical benefit; the temperature gains are substantial and have been put to practical use by UK growers for generations.
Case Study: The 5.5°C Gain from a Thermal Wall
In a practical UK application, grower Roger Marshall described how a simple stone wall running east-west created a south-facing microclimate that was up to 10°F (5.5°C) warmer than an area only 10-15 feet away. According to the report on gardening and microclimates, by leaning glass panes against the wall’s south side, the temperature differential increased even further. This simple combination of solar aspect and thermal mass allowed him to start tomatoes and peppers one to two weeks earlier than would otherwise be possible. The stone wall acted as a thermal battery, absorbing daytime heat and radiating it through the night for maximum effect.
To maximize this effect, several design elements should be considered. Terracing a steep slope creates flat planting areas that prevent soil and water runoff, while the vertical faces of the terraces can be lined with stone to add more thermal mass. Painting these retaining walls white or a light colour can further increase the amount of reflected light available to the plants. By layering these strategies—slope, wall, and reflective surfaces—you can effectively create a microclimate that mimics conditions found much further south.
This deliberate manipulation of light and heat is the difference between struggling to grow a heat-loving crop and having it thrive.
Row Planting vs Polyculture: Which Mimics Forest Resilience Better?
Traditional agriculture is built on the logic of the monoculture row: neat, single-species lines that are efficient for mechanical management but are also highly vulnerable to pests, diseases, and extreme weather. A bioclimatic approach, however, draws inspiration from a more resilient system: the forest. A forest floor is not a monoculture; it’s a complex, multi-layered polyculture where different species coexist, creating a web of mutually beneficial relationships and a highly stable internal microclimate.
Polyculture, or companion planting, seeks to replicate this natural resilience on a smaller scale. Instead of isolating crops, it strategically mixes them to create beneficial interactions. This goes far beyond the simplistic idea that « carrots love tomatoes. » It’s about designing a plant community that manages its own micro-environment. For example, tall, sun-loving crops like sweetcorn or climbing beans can be used to cast dappled shade on lower-growing, cool-season crops like lettuce or spinach. This « stacking » in space allows a grower to extend the harvest of heat-sensitive crops well into the summer, as documented by GrowVeg in their analysis of garden microclimates. The taller plants act as living sunshades, keeping the soil cool and moist for their shorter companions.
This system also builds resilience against drought. The deep-rooted taller plants can draw moisture from lower soil profiles, and through transpiration, they release some of this moisture into the air, creating a more humid microclimate that benefits the shallower-rooted plants around them. A dense, mixed planting also creates a living mulch that suppresses weeds and reduces soil moisture evaporation far more effectively than bare earth between rows. This self-regulating system buffers against the UK’s increasingly erratic weather patterns, where a period of intense sun and drought can quickly follow a cool, wet spell.
While polyculture may seem less orderly than traditional row planting, its « chaotic » appearance hides a deeper, systemic order. It replaces the fragility of the monoculture with the robust, interwoven strength of a natural ecosystem. It reduces the need for external inputs like irrigation and pest control because the system is designed to provide many of these services itself.
By mimicking the structure of a forest, you create a garden that not only produces a diverse yield but also actively conserves its own resources.
Why High-Maintenance Crops Must Be Visible from Your Kitchen Window?
The most sophisticated bioclimatic design can fail if it ignores a crucial element: human behaviour. A grower’s time and attention are finite resources. The success of high-maintenance crops—those needing daily watering, pest checks, or harvesting—is directly proportional to the frequency and ease of observation. This is where permaculture’s principle of « zoning » becomes a powerful tool for labour efficiency, starting with Zone 1: the area immediately surrounding your home or main hub of activity.
The core insight is simple but profound: the further away something is, the higher its « energetic cost » to manage. This isn’t just about walking distance; it’s about the psychological barrier to action. This is a concept from behavioural science that has direct application in farm design.
if spotting an aphid on a seedling requires a 2-minute walk, you won’t do it. If it’s visible from the window, the ‘cost’ of acting is near zero
– Behavioral Science Applied to Garden Planning, GrowVeg: Plan Your Garden to Create Perfect Microclimates
This principle dictates that anything requiring daily intervention must be placed within immediate sight and reach. This includes the propagation bench with vulnerable seedlings, the cold frame hardening off young plants, the cut-and-come-again salad beds, and ripening soft fruits. These are the elements that benefit from a quick, casual glance multiple times a day. You spot the first sign of mildew on a courgette or notice the soil in a module tray is dry while you’re drinking your morning coffee, and the corrective action is immediate and effortless.
Conversely, placing these high-need elements at the far end of a field or allotment creates a recipe for neglect. The task of « checking the seedlings » becomes a scheduled chore rather than a continuous, passive observation. By the time you make the dedicated trip, a small aphid problem may have become a full-blown infestation. By designing your site layout around intervention frequency, you align your farm’s structure with your own natural patterns of movement and attention, making good management the path of least resistance.
It transforms farm management from a series of exhausting chores into a fluid, responsive process, saving time and preventing small problems from becoming costly crises.
Key Takeaways
- Energy is a Resource: Success lies in managing energy—storing solar heat in thermal mass and deflecting wind energy with permeable barriers.
- Design for Flow: Understand and design for the flow of invisible forces like cold air, ensuring it can drain away from valuable crops instead of pooling around them.
- Mimic Natural Systems: Polyculture and other ecosystem-inspired designs create resilient, self-regulating microclimates that buffer against extreme weather and reduce the need for external inputs.
Applying Permaculture Zoning Principles to Save 10 Hours of Farm Labor Weekly?
Extending the principles of Zone 1 to the entire holding reveals a powerful system for radical labour reduction. Permaculture zoning is not just about placing things; it’s a strategic framework for organising a site based on the frequency of human use and interaction. By grouping elements according to their management needs, you can eliminate thousands of wasted steps and hours of inefficient work over a season. The goal is to create a logical, energy-efficient flow for all major activities: planting, watering, harvesting, and processing.
The system is typically broken down into five zones. Zone 1, as discussed, is for daily-visit elements. Zone 2 is for crops needing attention every few days, like staked tomatoes or maincrop beds that require regular weeding. This zone should also house key infrastructure like the main tool store and compost bins used for potting mixes. Zone 3 is for lower-maintenance main crops like potatoes, onions, and squash, which might be visited weekly. Zone 4 is semi-wild, used for managed foraging, coppicing, and grazing. Zone 5 is a completely wild area, left for nature and observation.
The time savings from implementing this are not theoretical; they are concrete and substantial. By minimising the distance between related tasks and resources, you create a highly efficient workflow. The water butt is next to the thirsty beds; the compost heap is central to the main growing areas; the tool shed is a short walk from Zone 2, not a long trek from the house. A poorly designed site forces you to constantly criss-cross the land, carrying tools and materials over long distances. A well-zoned site creates smooth, circular paths that conserve human energy. The impact on weekly labour can be transformative, as a case study analysis shows.
The following table, based on an analysis of allotment efficiency improvements, breaks down the potential time savings from redesigning a standard plot using zoning principles. The reduction in time spent on simple, repetitive travel is staggering.
| Activity | Before Zoning (mins/week) | After Zoning (mins/week) | Time Saved |
|---|---|---|---|
| Tool Trips (shed to beds) | 100 | 24 | 76 mins |
| Watering (carrying cans) | 120 | 30 | 90 mins |
| Seedling Checks (Zone 1) | 80 | 20 | 60 mins |
| Compost Transport | 60 | 15 | 45 mins |
| Harvest Collection | 90 | 35 | 55 mins |
| Material Flow (general) | 150 | 60 | 90 mins |
| Weekly Total | 600 mins (10 hours) | 184 mins (3 hrs) | 416 mins (6.9 hrs) |
By conducting an audit of your own movements and applying these zoning principles, you can systematically reclaim hours of your time, turning that energy from wasteful transit into productive, high-value work.