Soil compaction isn’t just about hard ground; it’s a silent thief robbing your pasture of up to 40% of its yield. The key isn’t a high-tech penetrometer, but learning to read the visual clues your soil is already giving you.
- Root behaviour is your primary informant; shallow, horizontal roots tell a clear story of a barrier below.
- Soil structure is the fingerprint of past damage; learning to spot ‘blocky’ or ‘platy’ layers is crucial.
- Water movement, or lack thereof, provides definitive evidence of your soil’s functional plumbing.
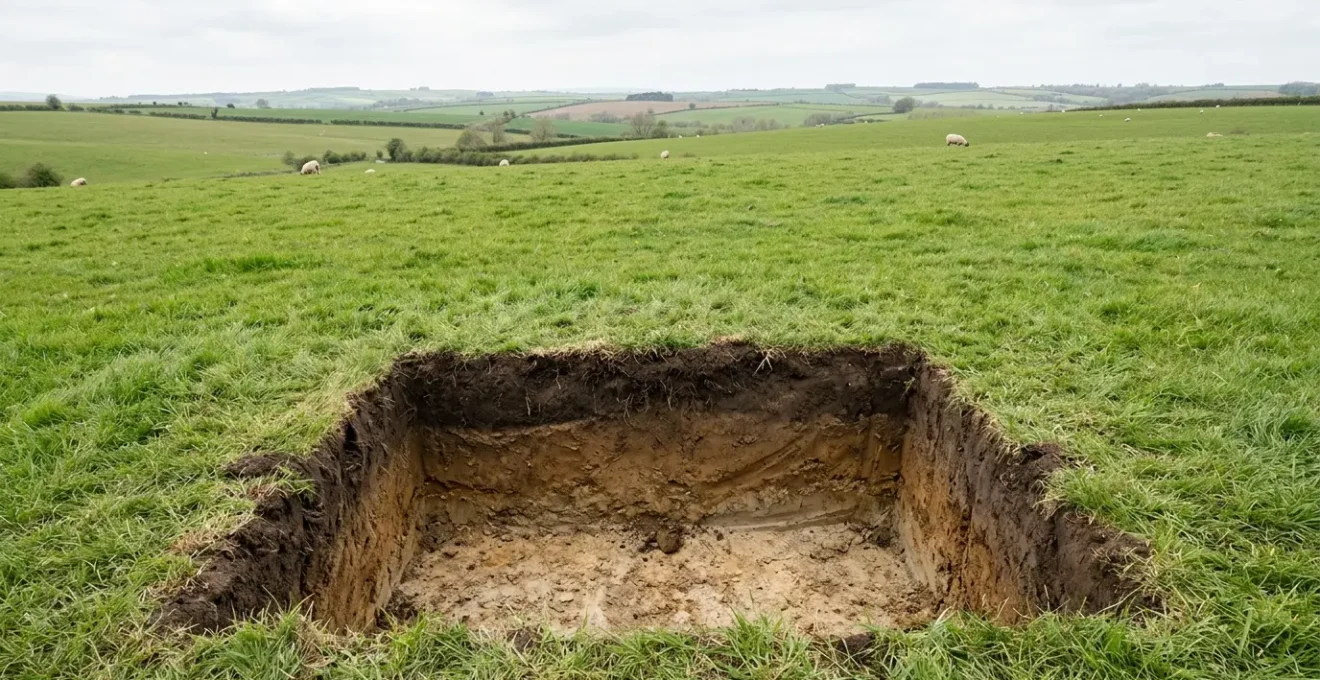
Recommendation: Start by digging one comparative pit—one in a ‘good’ area, one in a ‘bad’ one—to calibrate your eye and begin your diagnostic journey.
You see it in late summer: patches of your pasture are struggling. The grass looks stressed, drainage is poor after a downpour, and your livestock don’t seem to be getting the forage they should. The usual advice is to aerate, subsoil, or throw fertiliser at the problem. But these are solutions, and you can’t apply the right solution until you’ve made the right diagnosis. Compaction is the likely culprit, but it’s a furtive thief, stealing yield from below the surface where you can’t see it.
This guide isn’t about giving you more generic advice. It’s about turning you into a soil detective. We’re going to put away the expensive lab tests and high-tech gadgets for a moment and go back to the most powerful diagnostic tool you own: a spade and your powers of observation. Forget just « looking » at the soil; we’re going to teach you how to *read* it. The colour, the structure, the way roots behave, the very smell of the earth—these are all clues.
The core principle is simple: your soil profile is a storybook of its history and health. A dense, plate-like layer at 15cm is a chapter about a heavy stocking period on wet ground years ago. A network of deep, fine roots tells a tale of good aggregation and healthy biology. By learning to interpret these visual clues, you can pinpoint the exact depth and nature of a compaction pan, understand its cause, and make a targeted, cost-effective management decision, rather than guessing with a costly piece of machinery.
This article will walk you through the process of this soil investigation. We’ll cover where to dig, what to look for, how to interpret the evidence, and even how to document it for compliance schemes like the SFI. It’s time to get your hands dirty and uncover the truth your pasture is waiting to tell you.
This article provides a step-by-step guide to becoming a soil detective on your own farm. Follow along as we uncover the secrets hidden just beneath the surface.
Summary: A Farmer’s Guide to Diagnosing Pasture Compaction
- Why Shallow Roots in July Indicate a Pan at 15cm Depth?
- How to Dig and Photograph a Soil Pit for SFI Compliance?
- Blocky vs Crumb Structure: What Your Subsoil Is Telling You?
- The Moisture Mistake That Makes Clay Soils Look Compacted When They Aren’t
- Where to Dig: Selecting Representative Sites for a Valid Farm Analysis
- How to Use Puddle Duration to Assess Infiltration Rates?
- How to Conduct a Percolation Test to Measure Macropore Function?
- How to Use Bio-Indicator Observation to Diagnose Soil Health Without Lab Tests?
Why Shallow Roots in July Indicate a Pan at 15cm Depth?
The first and most telling clue in your soil investigation is the behaviour of your plant roots. In a healthy, uncompacted soil, pasture roots should be exploring deep into the profile, searching for water and nutrients. When you dig a pit and find that roots are overwhelmingly concentrated in the top few inches, and worse, are growing horizontally, you have your primary suspect: a compaction pan. This layer acts as a physical barrier, as impenetrable to fine roots as a layer of concrete.
Why is July such a critical month for this observation? Because that’s when the topsoil moisture is typically at its lowest. Plants are desperately trying to send roots deeper to find water. If they can’t, the sward will show drought stress far earlier than it should. This horizontal rooting, often called « root matting, » is a clear confession from the plant. It’s telling you, « I tried to go down, but I hit a wall. » This is often a hard, dense layer of soil, or « pan », located just below the main rooting zone.
This isn’t just an anecdotal observation. Field studies consistently back it up. For instance, research on compacted pastures shows that 90 percent or more of roots can be concentrated in the top 3 inches (about 7.5 cm) of the soil. The roots simply don’t have the energy to push through the dense, oxygen-poor layer below. This shallow rooting system makes the pasture incredibly vulnerable to drought and limits its ability to access the full nutrient profile of the soil.
Case Study: The 15cm Root Barrier
A revealing FAO study on grass-white clover pastures in Slovenia provided a stark illustration of this principle. In compacted heavy soils, they documented that at depths greater than 15 cm, there was less than one root per square centimetre to be found. The bulk of the pasture species’ roots were physically stopped at this 15cm pan. Only the more aggressive taproots of white clover were occasionally able to find and exploit existing cracks or fissures to push deeper, highlighting how severely a compaction pan restricts the potential of the entire sward.
Think of it as a nutritional bottleneck. Even if your subsoil is rich in minerals, a compaction pan at 15cm means your pasture is effectively living in a shallow pot, unable to access the resources just below its reach. Identifying this root behaviour is the first step in diagnosing the problem and unlocking your pasture’s true potential.
How to Dig and Photograph a Soil Pit for SFI Compliance?
Once you’ve identified a suspicious area, the next step is to open up the « crime scene » for a full investigation. Digging a soil pit isn’t just about making a hole; it’s about creating a clean, readable cross-section of your soil’s horizons without destroying the evidence. A well-dug pit allows you to clearly see the changes in structure, colour, and root activity that tell the story of compaction. Furthermore, with schemes like the Sustainable Farming Incentive (SFI), proper documentation is not just good practice—it’s a requirement.
First, select your tools: a sharp, straight spade is essential. You’ll be digging a hole roughly two feet deep and at least one foot wide, with three straight vertical sides. The fourth side can be sloped to allow for easy access. The key is to create a clean, undisturbed vertical face to « read. » Once the pit is dug, take a knife or a small trowel and gently pick away at one of the vertical faces. The goal is to remove the « smear » left by the spade, which can mask the true soil structure, and reveal the natural aggregates (or lack thereof).

With your clean profile wall ready, it’s time for documentation. For SFI compliance, photographic evidence is crucial. The best photo is one taken in good, natural light (avoiding harsh midday sun) that shows the entire profile from the surface down. Place a measuring tape or even your spade (if you know its length) alongside the profile to provide a clear scale. Take close-up shots of any interesting features: the abrupt end of root growth, a change in colour, or a particularly dense, blocky layer. These photos, combined with your written notes, form the core of your soil assessment record.
Your SFI Compliance Checklist: Documenting the Evidence
- Timing is everything: Assess your soil in spring or autumn when it’s not too wet or too dry to get a true reading of its structure.
- Create written records: Document your observations in a soil management plan, noting the depth, colour, and structure of each layer, and any signs of compaction.
- Gather photographic evidence: Take clear photos of your soil pits, including a scale for reference. Use field maps to mark the locations of your assessments.
- Store evidence securely: Keep your written plan and photos in an accessible format so you can supply them if requested for verification.
- Respect historical features: Before digging, check your SFI Historic Environment Farm Environment Record (HEFER) and avoid taking samples from areas with known archaeological features.
This process of careful excavation and documentation elevates you from simply digging a hole to conducting a forensic analysis. It provides you with the irrefutable evidence needed for both effective management and regulatory compliance.
Blocky vs Crumb Structure: What Your Subsoil Is Telling You?
With your soil pit cleanly prepared, you can now start reading the most important chapter in your soil’s story: its structure. Soil structure is the arrangement of soil particles into aggregates, and it is the single best visual indicator of compaction. A healthy, uncompacted topsoil typically exhibits a crumb structure. It looks like a chocolate cake or breadcrumbs—full of small, rounded aggregates with plenty of pore space between them for air, water, and roots to move freely. When you handle it, it should crumble easily.
The story changes dramatically when you encounter a compacted layer. Here, the structure is often blocky or even platy. Blocky structures consist of sharp-angled, dense blocks of soil that fit together tightly, leaving very little room for anything to pass through. Platy structures are even worse, consisting of horizontal layers or plates of soil stacked on top of each other, forming a near-impenetrable barrier. When you try to break these aggregates apart in your hand, they feel hard and resistant. This is the physical pan you’re looking for.
This structural signature is the direct result of pressure from heavy machinery or high stocking densities, especially on wet soils. The pressure squeezes the soil particles together, destroying the pore spaces and creating these dense, blocky forms. According to soil scientists, these compacted layers commonly occur between 10 and 40 cm depth, often showing this distinct massive or blocky appearance. Finding this layer is your « aha! » moment. You can measure its depth and thickness, giving you a precise target for any future remediation.
To pinpoint the transition, use a simple but effective tool: a wire flag or a long screwdriver. Gently push the wire into the soil profile wall at one-inch intervals, starting from the top. You will feel a noticeable increase in resistance when you hit the compacted layer. This tactile feedback, combined with the visual evidence of the changing structure, provides a definitive diagnosis of the location and severity of your compaction pan. This layer is the villain of our story, the direct cause of the poor water infiltration and restricted root growth you’re seeing at the surface.
The Moisture Mistake That Makes Clay Soils Look Compacted When They Aren’t
As a soil detective, you must also learn to recognise the red herrings—the clues that seem to point one way but are actually misleading. The biggest false positive in soil compaction diagnosis is assessing a clay-rich soil when it’s either bone dry or too wet. Soil moisture content dramatically affects its perceived structure, and getting the timing wrong can lead you to an entirely incorrect diagnosis.
When a heavy clay soil dries out completely, it shrinks and cracks, but the aggregates themselves can become rock-hard. Trying to assess this soil will feel like you’re dealing with concrete. You might conclude it’s severely compacted, when in reality, it’s just very, very dry. Conversely, when the same clay soil is too wet, it becomes plastic and malleable. Squeezing it in your hand will form a smooth, shiny surface, and it will lose all visible structure. Again, you might conclude it’s a massive, compacted mess, when in fact, it’s just saturated.
The ideal time to assess soil structure, especially in clays, is when it is at a ‘friable’ moisture level—moist but not wet, like a wrung-out sponge. At this stage, the true structure of the soil reveals itself. You can easily break apart the aggregates to see if they are crumbly and well-formed or hard and blocky. This is why a soil assessment in late spring or autumn is often most reliable. A simple field test can save you from this common diagnostic error.
Action Plan: The Field Moisture Ribbon Test
- Take a sample: Grab a small handful of soil from the depth you want to assess.
- Form a ribbon: Try to push the soil between your thumb and forefinger to form a continuous ribbon.
- Interpret the ribbon’s length: If the ribbon breaks off within 1 or 2 inches, the moisture is likely ideal for assessment, and the risk of creating more compaction is low.
- Identify ‘too wet’ conditions: If the ribbon stretches out to 4 or 5 inches before breaking, the soil is too wet and plastic. It will smear and give a false reading. Wait for it to dry out.
- Confirm with a ball test: As an alternative, make a 2-inch ball of soil and toss it gently. If it holds its shape until impact, it’s too cohesive and likely too wet to assess accurately.
By ensuring your soil is in the right condition for assessment, you avoid the ‘moisture deception’. This discipline separates a novice from an expert soil detective, ensuring your diagnosis is based on the soil’s true character, not the temporary effects of weather.
Where to Dig: Selecting Representative Sites for a Valid Farm Analysis
A single soil pit tells the story of one spot. But as a farm manager, you need to understand the story of the whole field, or even the whole farm. A good soil detective knows that the location of the investigation is just as important as the investigation itself. Digging randomly will give you random, and potentially misleading, results. The key is strategic site selection to build a representative picture of your farm’s soil health.
Start by looking at the bigger picture. Use topography to your advantage. Your fields are not uniform. You can likely identify three distinct zones just by looking: hilltops (often erosional, with thinner topsoil), slopes (transitional zones), and low-lying areas (depositional, often with deeper topsoil but potentially wetter). Compaction will behave differently in each of these zones, so assessing one of each will give you a much more complete map.

The most powerful diagnostic technique is paired pit analysis. Instead of just digging in a ‘bad’ area, dig two pits close to each other: one in the struggling patch and one in an adjacent ‘good’ area that is thriving. This direct comparison is incredibly illuminating. It controls for many variables (soil type, rainfall) and isolates the impact of management, often revealing dramatic differences in structure and root depth over just a few metres.
Finally, be aware of the invisible farm infrastructure. Before choosing a site, think about historical and current use. High-traffic areas like gateways, around water troughs, and preferred livestock tracks will almost certainly be compacted. Also, consider old fence lines or historical field boundaries. The soil under a fenceline has often been protected from traffic for decades and can serve as an invaluable ‘control’ or reference point for what your soil’s potential truly is. Comparing the soil in the pasture to the soil under the fenceline is often a sobering experience, revealing inches of lost topsoil height and a complete change in soil structure.
- Identify Zones: Use topography to divide your field into distinct zones (hilltops, slopes, low-lying areas).
- Use Paired Pits: Always dig in a ‘good’ area and an adjacent ‘bad’ area for a powerful direct comparison.
- Map Invisible Infrastructure: Be aware of high-traffic zones like gateways and water troughs, as these are hotspots for compaction.
- Find Your Control: Use the soil under a long-standing fence line as an uncompacted reference to see your soil’s true potential.
- Create a Compaction Map: Use the data from your pits to draw a simple map, turning your diagnosis into a strategic plan for targeted remediation.
How to Use Puddle Duration to Assess Infiltration Rates?
One of the most obvious symptoms of compaction is water that sits on the surface long after a rainstorm. This tells you that the soil’s plumbing is blocked. A healthy soil should act like a sponge, quickly absorbing water. A compacted soil acts more like a paved car park. You can easily quantify this difference with a simple, DIY infiltration test, which is a fantastic way to gather evidence on how well your soil is functioning.
This test measures the rate at which water enters the soil. In a compacted soil, the fine pore spaces that conduct water have been squeezed shut. The result is a drastically reduced infiltration rate, leading to surface ponding, runoff, and a failure to recharge subsoil moisture. This is not only bad for grass growth but also increases the risk of nutrient loss and erosion as water flows over the surface instead of into it.
The beauty of the infiltration test is in comparison. By conducting the test in a known ‘bad’ area (e.g., a tractor wheeling or gateway) and an adjacent ‘good’ area (e.g., under a fenceline or in a thriving patch of pasture), you can demonstrate the impact of compaction in a dramatic and visual way. You might find that water disappears in seconds in the healthy soil, while it takes many minutes or even hours in the compacted zone. This provides powerful, quantifiable evidence of a functional problem.
Here’s how to conduct a simple cylinder infiltrometer test in the field:
- Step 1: Find a cylinder. A 6-inch diameter pipe or a large metal food can with both ends cut off works perfectly as an infiltrometer.
- Step 2: Seal the chamber. Carefully hammer or press the cylinder about 2-3 inches into the soil. Try to do this with minimal disturbance to the soil inside the ring.
- Step 3: Add water and start timing. Pour a set amount of water into the cylinder (for example, enough to create a 1-inch depth) and start your timer immediately.
- Step 4: Record the time. Stop the timer as soon as the water has completely disappeared from the surface. You can then calculate your infiltration rate in inches per hour.
- Step 5: Conduct a comparative test. Repeat the exact same procedure in a known compacted area and an adjacent protected area. The difference in the recorded times will be your evidence.
Key takeaways
- Soil compaction is a hidden problem that can drastically reduce pasture yield and resilience.
- Visual soil assessment (VSA) is a powerful, low-cost diagnostic tool that any farmer can master.
- The key is to move from simply ‘looking’ at soil to ‘reading’ the clues in its structure, root patterns, and water behaviour.
How to Conduct a Percolation Test to Measure Macropore Function?
While the infiltration test measures how water enters the soil surface, the percolation test gives you an idea of what happens next. It’s an assessment of your soil’s deep plumbing—specifically, the function of its macropores. These are the large pores created by earthworms, old root channels, and soil aggregation. They are the superhighways that allow for rapid movement of water and air deep into the soil profile and are essential for good drainage and deep rooting.
Compaction is the mortal enemy of macropores. It crushes these vital channels, turning the subsoil into a dense, uniform mass with only tiny micropores. Water can move through micropores by capillary action, but it does so very slowly. Without a functional network of macropores, your soil will become waterlogged after rain and will be unable to drain effectively, starving roots of the oxygen they need to survive and function.
A simple percolation test, conducted in the bottom of your soil pit, can give you a qualitative sense of macropore function. After examining your pit’s structure, pour a bucket of water into the bottom and observe. Does it drain away relatively quickly? This suggests that a network of macropores is present and connected, allowing water to escape downwards. Or does the water just sit there, turning the bottom of your pit into a muddy pond? This is a clear sign that the subsoil is dense and lacks the macroporosity needed for good drainage. This is what it feels like to hit « rock bottom » from a soil health perspective.
Case Study: The Power of Management to Restore Macropores
Compaction doesn’t have to be a permanent sentence. A three-year, SARE-funded study highlighted by Cornell University showed that soil compaction can dissipate within months if management changes. On a continuously overgrazed pasture, an enclosure was set up to mimic hay production (periodic cutting instead of constant grazing). The soil resistance within the enclosure started to improve, moving closer to the uncompacted fenceline’s resistance. This demonstrated that simply changing grazing management allowed the soil’s natural processes—biology, weather, and root action—to begin rebuilding the macropore network and healing the compaction, measurably improving soil function.
This shows that your diagnostic work isn’t just about finding problems; it’s about identifying opportunities. By pinpointing the dysfunctional layers, you can implement targeted management changes—like rotational grazing or changing forage species—that allow the soil to heal itself, restoring the vital macropore network from the top down.
How to Use Bio-Indicator Observation to Diagnose Soil Health Without Lab Tests?
The final clues in your soil investigation come from the life within it. The plants, worms, and even the smell of the soil are powerful bio-indicators that can provide a quick and surprisingly accurate diagnosis of its health, all without sending a single sample to a lab. A compacted, waterlogged, and anaerobic soil is a hostile environment for most life, and its absence speaks volumes.
The most obvious bio-indicators are the plants themselves. You may notice a shift in the species composition in compacted areas. Deep-rooting species like chicory or lucerne may disappear, replaced by shallow-rooting grasses or compaction-indicator weeds like daisies or creeping buttercup. These plants aren’t the cause of the problem, but they are a symptom of the underlying conditions.
Next, get your hands dirty and look for the engineers of the soil: earthworms. Dig a spadeful of soil and count them. A healthy, well-aerated soil should be teeming with worms. Finding fewer than 3-5 per spadeful is a warning sign. Earthworms are crucial for creating macropores and building soil structure. Their absence indicates that the soil may lack the oxygen or food source they need to thrive. Also, observe the soil’s smell. Healthy soil has a pleasant, rich, earthy smell. A sour, metallic, or rotten-egg odour is a major red flag, indicating anaerobic conditions where beneficial microbes have been replaced by ones that don’t require oxygen.
Ultimately, all these factors tie back to farm profitability. Poor soil health directly impacts forage production. It’s not just a theoretical problem; it has a real financial cost. As documented by agricultural research, yield losses can be significant, with some studies showing that severely compacted soils can lead to 20 to 40 percent annual yield losses. This is a massive hit to your bottom line, all happening silently beneath the surface.
- Earthworm Count: Dig a pit and count the worms per spadeful. A low count is a clear indicator of poor soil biology, often linked to compaction and waterlogging.
- Visual Soil Assessment (VSA): Look at the vegetation on the surface. A shift towards shallow-rooting weeds and a lack of deep-rooting herbs can indicate a compaction issue.
- Root Patterns: Observe the depth and density of root channels in your soil pit. A healthy soil will have deep, branching root networks.
- Soil Smell: Trust your nose. A healthy, earthy smell is a good sign. A sour or metallic odour indicates serious anaerobic problems.
- Aggregate Stability: Test the integrity of your soil aggregates by placing them in water. If they break down into a cloud of particles, your soil structure is weak.
By following these diagnostic steps, you have transformed a patch of struggling grass from a frustration into a source of valuable information. You’ve learned to read the clues in the roots, the structure, the water, and the life of your soil. You are now equipped not just to identify a problem, but to understand its specific nature, location, and severity. This knowledge is the foundation of smart, targeted, and profitable grassland management. Start with one pit, and begin your journey as your farm’s own soil detective.