In summary:
- Indicator weeds like docks and thistles reveal specific soil issues such as compaction through their root behavior, not just their presence.
- Observing how long water puddles remain after rain provides a direct, no-cost measure of your soil’s infiltration capacity and structural health.
- A plant’s internal sugar levels (Brix) are a more reliable indicator of nutrient uptake and stress than visual signs like leaf color alone.
- Developing a « farmer’s eye » is about learning to read the interconnected stories told by plants, water, and soil structure together as a complete system.
There’s an old wisdom in farming, a skill often called the « farmer’s eye. » It’s the ability to walk a piece of land and understand its health not through a lab report, but through the language of the land itself. Modern agriculture often pushes us toward data sheets and chemical analysis, telling us to trust numbers over our own senses. We’re told that clover means low nitrogen or yellow leaves mean a deficiency, reducing the complex life of the soil to a simple, and often misleading, checklist.
But what if these indicators are not just isolated signals, but chapters in a much larger story? The real art of soil diagnosis lies not in identifying a single sign, but in understanding the interconnected narrative of competition, structure, and flow that is constantly unfolding beneath our feet. The presence of a thistle isn’t just a « weed problem »; it’s a commentary on soil density written by a deep taproot. A puddle that lingers for hours isn’t just a drainage issue; it’s a sign that the soil has lost its ability to breathe.
This guide is about reclaiming that observational wisdom. We will move beyond simplistic checklists to explore how you can read the dynamic systems at play in your soil. We will look at what the « problem » plants are really telling you, how to interpret the behavior of water, how to gauge a plant’s inner vitality, and how to physically examine the soil’s architecture to understand its history and its potential. It’s time to learn the language of your land.
This article will guide you through the essential observations that allow you to build a deep, intuitive understanding of your soil’s condition. The following sections break down the key bio-indicators and observational techniques you can start using today.
Table of Contents: How to Read Your Soil’s Natural Signals
- Why Docks and Thistles Indicate Specific Soil Imbalances?
- How to Use Puddle Duration to Assess Infiltration Rates?
- Brix vs Visual Inspection: Which Tells You More About Plant Stress?
- The Seasonal Mistake: Misinterpreting Winter Dormancy as Poor Health
- The Daily Farm Walk: How to Structure Your Observation Route for Maximum Insight?
- Blocky vs Crumb Structure: What Your Subsoil Is Telling You?
- Why Yellow Rattle is Key to Restoring Species-Rich Grasslands?
- How to Conduct a Soil Horizon Analysis to Identify Compaction Layers in Pasture?
Why Docks and Thistles Indicate Specific Soil Imbalances?
Seeing a field full of broad-leaved docks or creeping thistles often triggers an immediate response to eradicate them. But an experienced observer sees them not as enemies, but as messengers. These plants are specialists, evolved to thrive in conditions where other, more desirable species struggle. Their very presence tells a story about the soil beneath them, and the most important chapter of that story is about compaction and nutrient imbalance.
Docks and thistles are characterized by a powerful, deep taproot. This isn’t an accident; it’s their primary survival tool. In dense, compacted soil where fine-rooted grasses cannot penetrate, these taproots act like biological drills, forcing their way downwards to access moisture and nutrients locked in deeper layers. In fact, research from Scotland’s Farm Advisory Service shows that a dock’s taproot can penetrate to depths of nearly 2.6 meters to survive. They are nature’s subsoilers, indicating a hardpan or compacted layer that is suffocating the soil ecosystem.
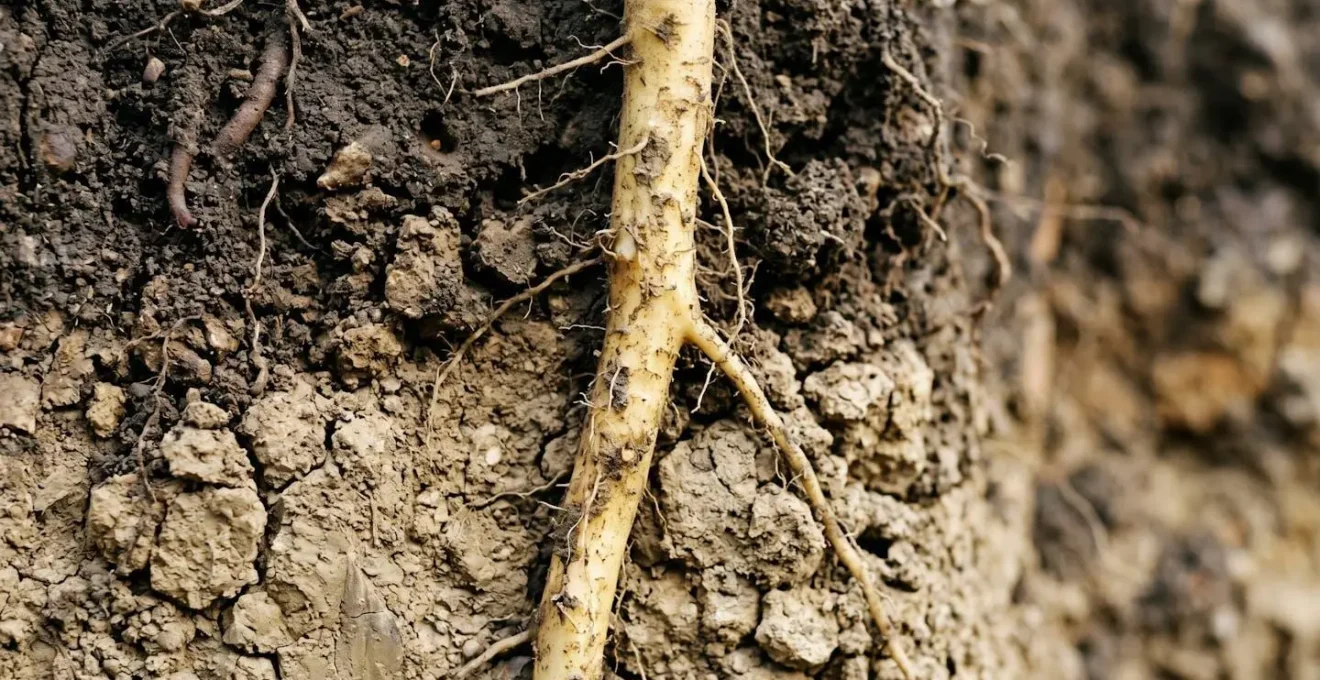
This taproot also allows them to mine for specific nutrients. These plants often flourish in soils with high levels of phosphorus (P) and potassium (K) that are not readily available to other plants due to poor soil structure or pH imbalance. They don’t just indicate a problem; they actively try to solve it by pulling these nutrients to the surface. When they die and decompose, they release these minerals back into the topsoil in a more available form.
Case Study: The Universal Language of Docks
A collaborative study across three European countries identified consistent risk factors for broad-leaved dock occurrence, despite very different climates and soil types. The primary factors were an open, damaged sward, high soil phosphorus and potassium content, and significant soil compaction. The presence of companion weeds like broadleaf plantain and annual bluegrass further confirmed that these plants are part of an ecological community that signals disturbed, overly enriched, and compacted ground.
Instead of simply killing the weed, the wise grower asks: why is it here? The answer often involves improving soil structure through aeration, cover cropping with other deep-rooted plants, or adjusting grazing management to reduce compaction.
How to Use Puddle Duration to Assess Infiltration Rates?
After a heavy rain, one of the most honest assessments of your soil’s health is written in water. Walk your fields and observe where water stands and for how long. A puddle that disappears quickly is a sign of healthy, porous soil with good infiltration. A puddle that lingers for hours, or even days, is a clear warning that your soil’s structure is compromised.
Healthy soil is like a sponge. It is filled with a network of pores, channels, and tunnels created by roots, earthworms, and microbial activity. This is what’s known as good aggregate structure. These spaces, called macropores, allow water to move freely down into the soil profile, where it can be stored for plant use. When soil becomes compacted, these pores are squeezed shut. The soil becomes dense and plate-like, and water has nowhere to go but to sit on the surface or run off, taking valuable topsoil with it.
You can turn this simple observation into a measurable test without any special equipment. Simply note how long it takes for a puddle in a specific spot to disappear after a rainstorm. For a more standardized measure, you can perform a simple infiltration test using a cylinder (like a large can with both ends removed). Press it a few inches into the soil, pour in a measured amount of water (e.g., one inch), and time how long it takes to soak in. Repeating this in different areas—a healthy-looking patch, a livestock pathway, a tilled area—will give you a clear map of your soil’s structural integrity.
| Soil Type | Infiltration Time | Health Assessment |
|---|---|---|
| Light to Medium Soil (Good Structure) | 2-5 minutes | Healthy soil with good aggregation and biological activity |
| Heavy Clay (Moderate Structure) | 10-15 minutes | Acceptable but room for improvement through organic matter addition |
| Heavy Clay (Poor Structure) | 20+ minutes | Compacted soil indicating reduced macropore and earthworm activity |
Observing puddle duration is a direct window into your soil’s physical health. It tells you about compaction, biological activity, and the soil’s ability to capture and store the most vital resource of all: water.
Brix vs Visual Inspection: Which Tells You More About Plant Stress?
A common diagnostic approach is to look at a plant’s leaves. Are they yellow, purple, or spotted? While these visual cues can be useful, they are often lagging indicators of stress. By the time a plant shows a visible nutrient deficiency, it has already been suffering for some time. A more proactive and insightful method is to measure the plant’s Brix level, which gives you a real-time reading of its internal health and energetic signature.
Brix is a measure of the dissolved solids—primarily sugars, but also minerals and other compounds—in a plant’s sap. It is measured in degrees using a simple, handheld tool called a refractometer, which is surprisingly affordable; according to practical farming guides, a reliable one can be purchased for under $40. A high Brix reading indicates that the plant is photosynthesizing efficiently, creating plenty of sugars, and successfully drawing up a full suite of minerals and trace elements from the soil. This is a sign of a healthy, well-fed plant growing in a biologically active soil.
Conversely, a low Brix reading is an early warning sign. It tells you that even if the plant *looks* green and healthy, something is wrong. It may be struggling to photosynthesize due to a lack of sunlight or water, or the soil may be failing to provide the necessary nutrients. This low-sugar, low-mineral sap also makes the plant a prime target for pests and diseases, which are evolution’s way of cleaning up weak and unfit organisms. Plants with high Brix levels have a natural immunity and are far less attractive to insects.
| Brix Reading | Plant Health Status | Pest/Disease Resistance |
|---|---|---|
| Below 8% | Poor – Low nutrient density | Highly susceptible to pest and disease pressure |
| 8-12% | Fair – Moderate health | Moderate susceptibility |
| 12% or higher | Good to Excellent – High nutrient density | Better immunity to plant pests and diseases |
| 18%+ | Excellent – Very healthy and well-fed plant | Strong natural pest and disease resistance |
Measuring Brix shifts the focus from treating symptoms (like pests or yellow leaves) to addressing the root cause: the soil’s inability to support a fully thriving plant. It’s a powerful diagnostic tool for any grower wanting to move beyond reactive fixes and cultivate true, systemic health.
The Seasonal Mistake: Misinterpreting Winter Dormancy as Poor Health
As the growing season ends and winter sets in, it’s easy to look at a brown, dormant field and assume that all life has ceased. This is a common observational mistake. While the visible, above-ground parts of plants have shut down, the soil beneath is often still a hive of activity. Misinterpreting this quiet period as a sign of poor health can lead to missed opportunities for observation and soil building.
The world of roots operates on a different schedule than the world of shoots. Soil has a high thermal mass, meaning it cools down much more slowly than the air. This insulation allows soil life, and particularly root growth, to continue long after the first frosts have killed off the leaves. A plant that appears dead on the surface may be actively extending its root system deep into the soil, building structure and seeking out nutrients in preparation for spring.
Roots probably do not experience winter dormancy in the same way as shoots: 89% of the studies that examined winter phenology found evidence of growth during winter months.
– Research team publishing in Journal of Experimental Botany
The observant grower learns to shift their focus in winter. Instead of looking for green growth, they look for other signs of life. These include the presence of mycelial networks (the white, thread-like structures of fungi) on the surface of decaying leaves, the continued activity of earthworms evidenced by fresh castings on mild days, and the patterns of frost heave, which can reveal information about soil moisture and structure.
Case Study: The Hidden Life of Winter Soil
Educational research demonstrates that because soil mass is much larger than air mass, it remains significantly warmer than the air for extended periods during winter. Life underfoot can continue to thrive for weeks or even months as long as the soil remains unfrozen. When air temperatures drop below freezing for short periods, only the very surface layer begins to freeze. This temperature buffer explains why plant roots can continue growing well into fall and early winter, and why winter soil observation should focus on signs of biological activity like fungi and earthworms rather than an absence of visible foliage.
Winter is not a time of death, but a time of transition and underground preparation. Learning to read the subtle signs of this hidden activity provides a more complete, year-round understanding of your soil’s health and resilience.
The Daily Farm Walk: How to Structure Your Observation Route for Maximum Insight?
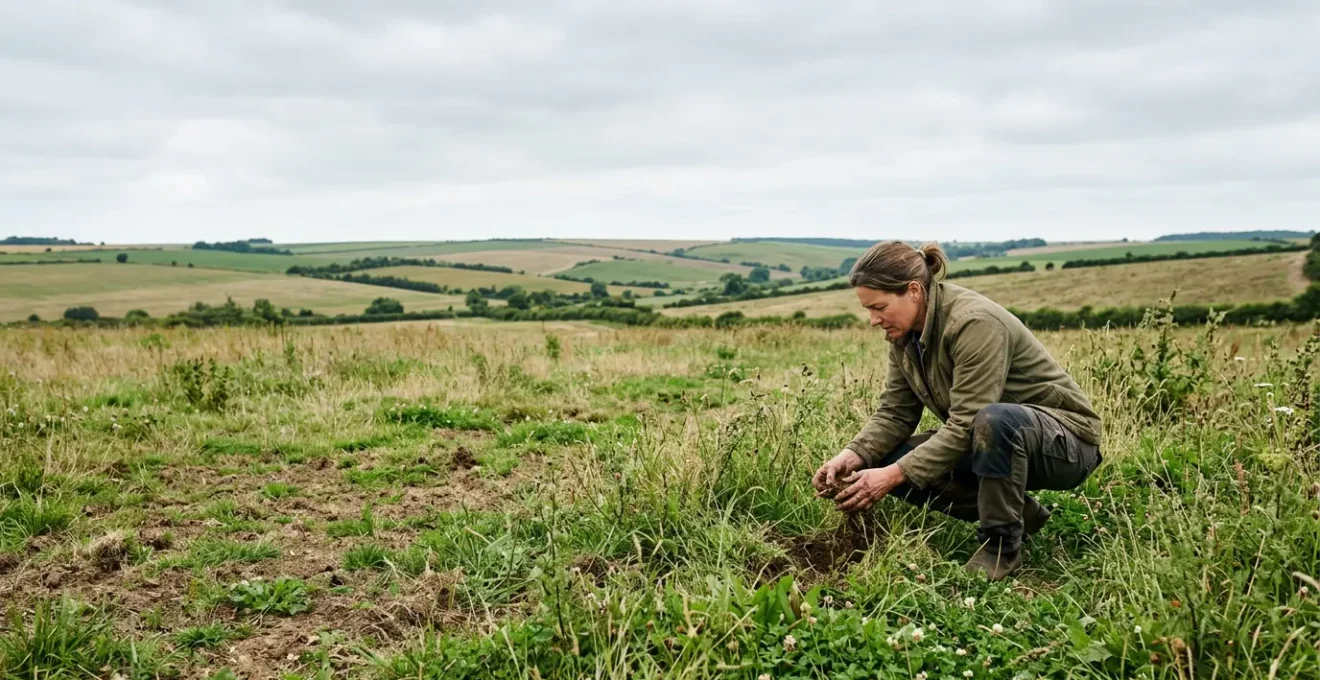
The most powerful diagnostic tool you own is your own presence on the land, repeated daily. The « farm walk » is not just a casual stroll; it is a structured, sensory practice. It’s the daily ritual where all the individual indicators—weeds, water, plant health, soil feel—come together to form a coherent narrative. To get the most from this practice, it’s crucial to approach it with intention and a framework for observation that engages all of your senses.
Your route should be consistent but also varied. Have a set path that takes you through different zones of your property: the highly managed garden beds, the permanent pasture, the fencelines, the low-lying wet areas, and the wooded edges. This allows you to compare and contrast, to notice subtle changes from one day to the next. What’s different after a rain? What new plants are emerging? Where are the insects congregating?
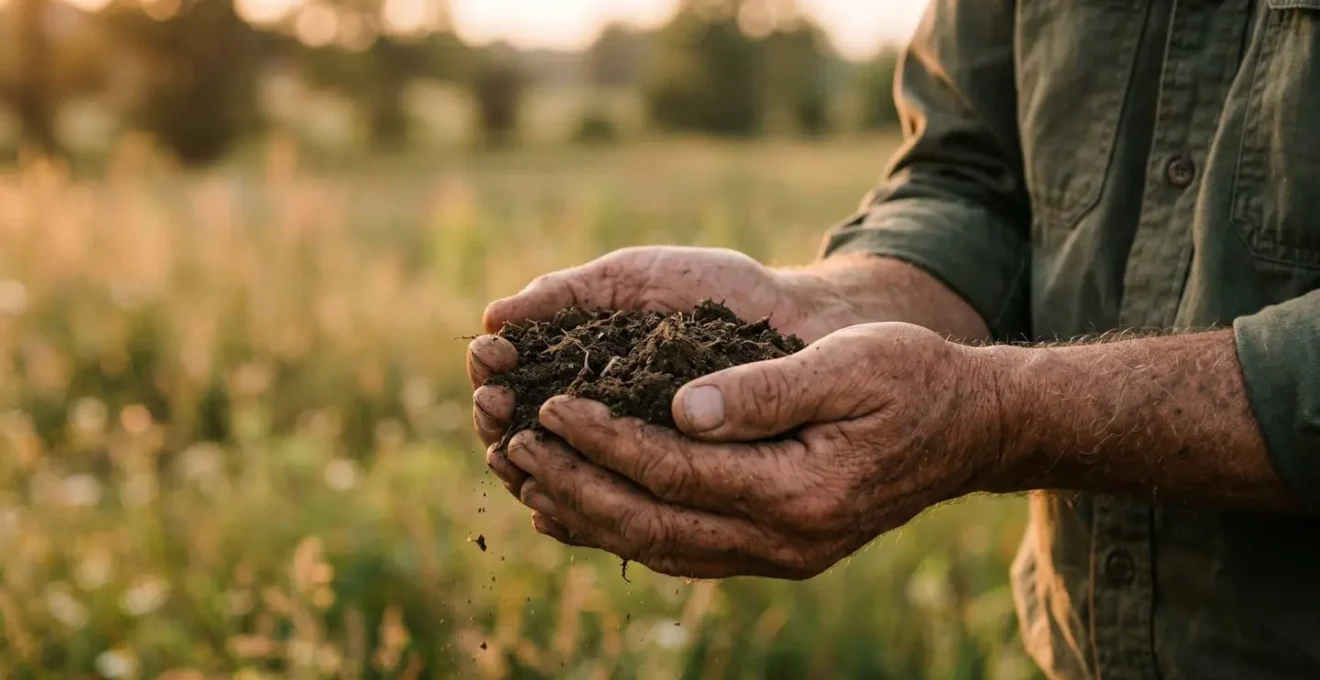
The key is to move from passive seeing to active, multi-sensory observation. Don’t just look at the soil; pick it up. Feel its texture—is it crumbly and loose, or hard and cloddy? Smell it. Healthy soil has a rich, earthy aroma, a scent of life. A sour or rotten smell indicates anaerobic (oxygen-deprived) conditions. Listen for the hum of pollinators or the scratching of birds foraging for insects, signs of a robust food web. This full-body engagement transforms the walk from a chore into a deep dialogue with your land.
Your 5-Point Soil Observation Audit: Reading the Land’s Signals
- Points of contact: Before you even step outside, list the « channels » through which your soil communicates. This includes indicator plants (weeds), water behavior (puddles, runoff), soil color and texture, insect and bird activity, and even the smell of the earth.
- Collecte: On your walk, actively inventory what you see. Take photos of dominant weed patches, note the exact location of waterlogged areas on a map, and scoop a handful of soil from different zones to feel its structure and moisture.
- Cohérence: Compare your observations to your goal for a healthy, living soil. Where are the biggest gaps? Does the hard, blocky structure in the pasture align with your goal of lush grazing? Does the lack of earthworms contradict your aim for a vibrant ecosystem?
- Mémorabilité/émotion: Of all your observations, which one tells the most compelling story? Is it the perfect, crumbly soil under an old fenceline that has never been tilled? Or the sour smell rising from a permanently wet spot? Identify this key « character » in your land’s narrative.
- Plan d’intégration: Based on that most telling observation, define one priority action. If the key issue is a compacted plow pan, your plan might be to plant a cover crop mix with deep-rooting tillage radishes to begin the work of breaking it up naturally.
The daily walk, structured in this way, is how the « farmer’s eye » is developed. It is a practice of paying attention, of building a deep, intuitive database of your land’s patterns and tendencies, turning you from a manager into a true partner with your soil.
Blocky vs Crumb Structure: What Your Subsoil Is Telling You?
One of the most direct ways to read your soil’s health is to look at its physical architecture. When you dig a small pit and examine the soil, you’re not just looking at dirt; you’re looking at a structure built (or destroyed) over time. The difference between a desirable « crumb » structure and a problematic « blocky » or « platy » structure tells you everything about the biological activity, water movement, and aeration of your soil.
A healthy, living topsoil exhibits a crumb structure. It looks like cottage cheese or a pile of breadcrumbs. These small, rounded aggregates are formed by the actions of soil life. Earthworms move through the soil, microbes excrete biological glues, and fungal hyphae weave everything together. This structure is full of pores of all sizes, allowing it to hold both air and water, and providing easy pathways for roots to grow. It is friable, meaning it breaks apart easily in your hands. This is the architecture of a resilient, fertile soil.
In contrast, a blocky or platy structure is a sign of degradation. Blocky aggregates are sharp-edged and fit together tightly, indicating compaction, often from heavy machinery or livestock. Platy structure consists of thin horizontal layers, like a stack of plates. This is a severe form of compaction and is almost impossible for water or roots to penetrate. This type of structure is often created by repeated tillage at the same depth, forming a « plow pan. » When you see these structures, you know that the biological processes that build soil have been shut down. The soil has become a physical barrier rather than a living medium.
The consequences of losing that good crumb structure are severe. Soil without aggregates cannot hold water, leading to runoff and erosion. In fact, data from UK agricultural studies indicates that an estimated 2.2 million tonnes of topsoil are lost to erosion each year, largely from soils with poor structure. This is your farm’s most valuable asset washing away.
By learning to identify these structural patterns, you can diagnose the health of your soil’s physical framework and understand the impact of your management practices on its long-term stability and fertility.
Why Yellow Rattle is Key to Restoring Species-Rich Grasslands?
Most of the indicators we’ve discussed are signals of an existing condition—compaction, nutrient lock-up, or poor drainage. Yellow Rattle (Rhinanthus minor), however, is a special kind of indicator. Its presence, or its successful introduction, signals the *beginning of a positive transformation* from a simple, grass-dominated sward to a complex, species-rich meadow. It is a tool as much as it is an indicator.
Yellow Rattle is known as the « meadow maker » for a very specific reason: it is a hemi-parasite. While it does photosynthesize, it also attaches its roots to the roots of its neighbors, particularly vigorous grasses, and draws nutrients and water from them. This act of « theft » weakens the dominant grasses, which would otherwise out-compete and shade out more delicate, slow-growing wildflowers. By suppressing the bullies, Yellow Rattle opens up physical space and allows light to reach the soil surface.
This creates the perfect opportunity for a wide diversity of wildflowers and legumes to establish themselves. The successful establishment of Yellow Rattle is therefore a powerful sign that the ecological dynamics of the grassland are shifting. It indicates that the stranglehold of the grass monoculture has been broken and the system is moving toward higher biodiversity. A field where Yellow Rattle thrives is a field on its way to becoming a healthy, multi-species ecosystem.
Case Study: Yellow Rattle as a Restoration Tool
Land managers actively use Yellow Rattle as a precision tool to transform grass-dominated monocultures. It functions as a hemi-parasite, latching onto the roots of vigorous grasses and weakening them by drawing nutrients. This reduces their competitive advantage, opening up space and light for more delicate wildflowers to establish. The plant requires specific sowing strategies, including scarification of the ground and autumn sowing to allow for a period of cold stratification. Its successful establishment signals the beginning of a shift from a simple to a complex grassland ecosystem, which in turn builds healthier, more resilient soil through increased biodiversity and a greater variety of root structures.
Observing Yellow Rattle isn’t just diagnosing a current state; it’s witnessing the process of regeneration in action. It’s a hopeful sign that biodiversity is returning, and with it, the foundation for a more resilient and self-sustaining soil system.
Key Takeaways
- Weeds are not enemies; they are messengers delivering specific information about your soil’s structure and mineral balance.
- Soil architecture is paramount. A crumbly, porous structure built by soil life is the foundation for water retention, aeration, and fertility.
- Developing a « farmer’s eye » is a skill built over time through consistent, multi-sensory observation, not a checklist to be memorized.
How to Conduct a Soil Horizon Analysis to Identify Compaction Layers in Pasture?
After learning to read the surface-level signs, the final step in developing a true farmer’s eye is to look directly at the soil’s profile. Digging a soil pit and conducting a horizon analysis is like opening the land’s history book. It allows you to see, layer by layer, the story of your soil’s formation, its health, and the impact of past management. It is the most definitive way to identify the depth and severity of compaction layers.
A soil pit doesn’t need to be massive. A hole about 50cm square and 40-60cm deep is usually sufficient. The goal is to get a clean, vertical face that reveals the different layers, or « horizons. » In a healthy pasture, you’ll typically see a dark, rich topsoil (the ‘A’ horizon), full of organic matter and crumbly in structure. Below this, the color will gradually transition to a lighter subsoil (the ‘B’ horizon), which is denser and has less organic matter.
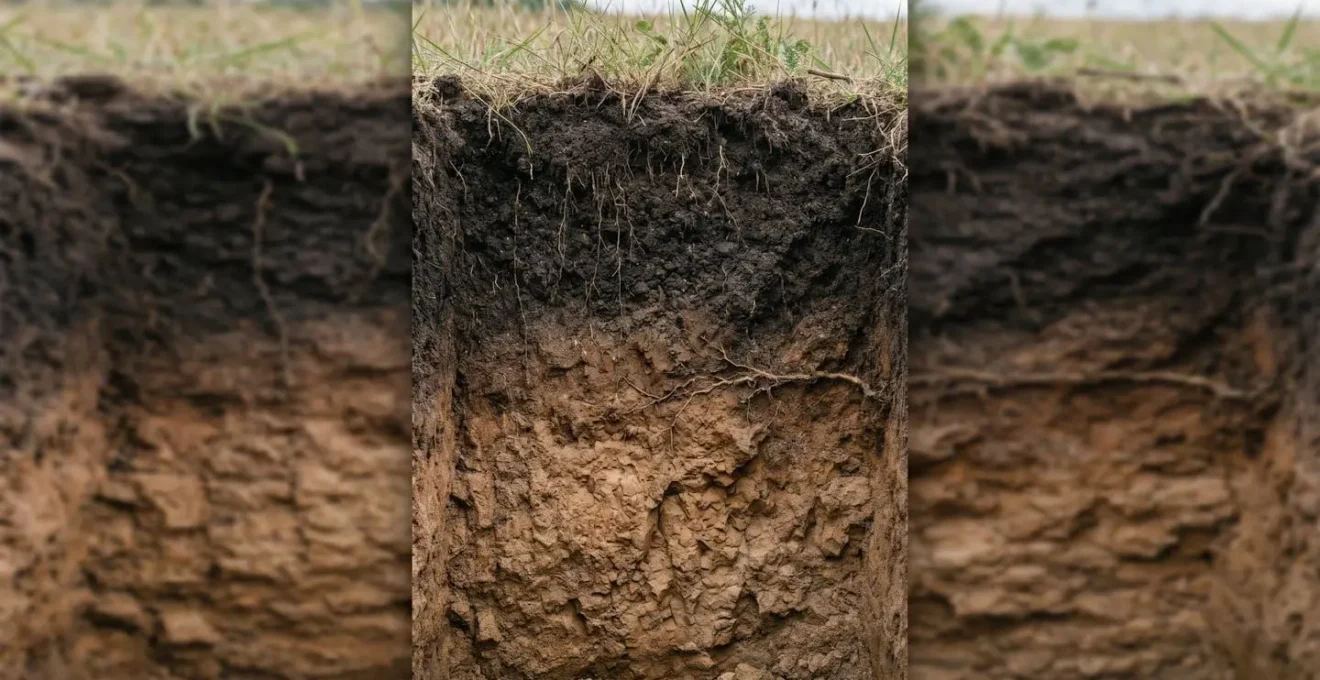
The key to diagnosis is looking for sharp, abrupt changes. Does the dark topsoil suddenly stop at a certain depth, hitting a dense, plate-like layer? Do you see a horizontal line where roots suddenly stop growing downwards and are forced to spread out sideways? This is a plow pan or a compaction layer. You might also see changes in color, such as greyish or mottled layers (a sign of waterlogging and lack of oxygen) or rust-colored streaks. Here is a simple procedure for this analysis:
- Choose the right time: Assess the soil when it’s moist, not waterlogged or bone-dry, as its structure will be most visible.
- Dig the pit: Select a representative spot and dig a pit at least 40cm deep, keeping one side of the pit as clean and vertical as possible.
- Extract a block: Use a spade to carefully remove an intact block of soil from the pit wall, about one spade’s width square.
- Examine structure: Lay the block on a tarp and gently break it apart with your hands along its natural fracture lines. Note whether it crumbles easily or breaks into hard, blocky clods.
- Look for boundaries: Examine the pit wall for abrupt changes in color, structure, or root penetration. Probe the wall with a knife or screwdriver to feel for changes in resistance that mark compaction layers.
- Note the depth: Measure and record the depth of the topsoil and the depth of any compaction layers you find. This data is critical for planning remediation.
This hands-on analysis is the ultimate ground-truthing. It confirms or challenges what the surface indicators have suggested and gives you a precise, undeniable diagnosis of your soil’s primary structural limitations, empowering you to take targeted and effective action.