In summary:
- Stop treating soil as a uniform block; learn to diagnose the health of each horizon (A, B, C) to apply the right intervention.
- Deep, inverting ploughing is destructive, burying your active topsoil. Use deep-rooting cover crops to build the A-horizon downwards instead.
- Master the « moisture window » for subsoiling. Performing it on wet soil creates a smear pan, which is worse than the original compaction.
- Observe your subsoil’s colour: blue-grey gleying and rotten-egg smells are urgent warnings of anaerobic conditions that kill yields.
- On slopes, build integrated systems of swales and tree belts to slow, capture, and infiltrate water, turning a climate threat into a farm asset.
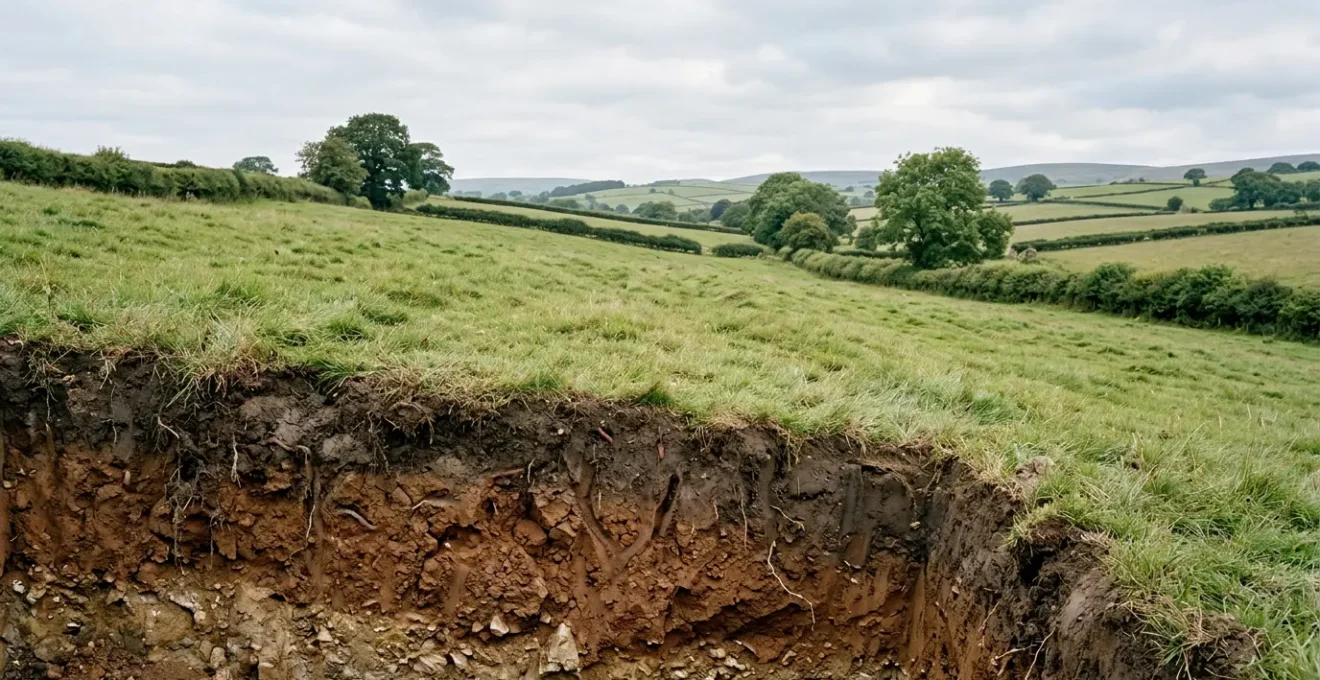
For any farmer working sloping ground in the UK, from the rolling hills of Devon to the uplands of Wales, the sight of muddy water running off a field is a gut-wrenching loss. That water carries away your most valuable asset: your topsoil, and with it, your fertility and future yields. For years, the standard advice has been a familiar mix of « plant cover crops » and « reduce tillage. » While not wrong, this advice barely scratches the surface of the problem. It treats the soil as a single, uniform entity when the reality is a complex, layered system of dynamic horizons.
The true key to preventing erosion and building resilient, profitable land for the long term isn’t about following a simple checklist. It’s about becoming a ‘soil diagnostician.’ It’s about learning to read the story your soil is telling you through its colour, its structure, and the life within it. This requires a radical shift in perspective: from managing the top few inches to actively engineering the entire soil profile, from the A-horizon down to the B-horizon and below. The problem of erosion isn’t just a surface issue; it’s a symptom of dysfunctional, stratified horizons.
But what if you could stop the damage and actively build fertility from the bottom up? What if you could learn to spot the warning signs of anaerobic decay before they devastate a crop, or know the precise week to subsoil to shatter compaction instead of creating an impermeable smear pan? This guide moves beyond the platitudes to give you the practical, observational skills to do just that. We will explore why conventional deep ploughing can sterilise your soil for years, how to use cover crops as « biological drills » to deepen your topsoil, and how to design climate-smart systems that turn the UK’s increasingly intense rainfall from a liability into an asset.
This article provides a detailed roadmap for understanding and managing your soil’s vertical profile. Explore the sections below to learn the specific techniques that will help you build a more resilient and productive farm.
Summary: A Practical Guide to Managing Soil Horizons on Sloping UK Fields
- Why Inverting Horizons via Deep Ploughing Reduces Yields for 5 Years?
- How to Deepen the A-Horizon by 2cm per Year Using Cover Crops?
- Subsoiling vs Keyline Plowing: Which Better Aerates the B-Horizon?
- The Color Change in Subsoil That Indicates Anaerobic Danger
- When to Subsoil: The Moisture Window You Must Respect to Avoid Smearing
- Why Slaking Happens and How It Seals Your Soil Surface?
- How to Construct Swales to Capture Runoff on Hill Farms?
- Designing Climate-Smart Systems to Buffer Extreme Rainfall Events in the North?
Why Inverting Horizons via Deep Ploughing Reduces Yields for 5 Years?
Deep ploughing that inverts the soil profile is a catastrophic event for soil biology, effectively burying your living, breathing A-horizon under a layer of sterile, mineral-heavy subsoil from the B-horizon. This single action destroys the fungal networks, smothers the aerobic bacteria, and displaces the earthworms that create your soil’s structure and fertility. The result is a ‘biological reset’ that can take up to five years to recover from, leading to a significant and prolonged yield penalty as the soil ecosystem struggles to re-establish itself. You are essentially forcing your next crop to grow in a biologically inert medium.
The problem is not the depth itself, but the inversion. The A-horizon is rich in organic matter and life precisely because it is at the surface, interacting with air, water, and plant residues. When you flip it, you place this life in an anaerobic environment where it cannot function, while bringing up a B-horizon that may be chemically and structurally hostile to plant roots. This process is known as horizon stratification, and it creates a stark disconnect between the surface and the subsoil, impeding water and root penetration.
However, this doesn’t mean the plough is always the enemy. A nuanced approach is key. Consider the experience of a UK farmer who, after two decades of successful no-till on heavy clay, observed soil organic matter plateauing. They strategically reintroduced ploughing, but not to invert the soil. Instead, they used it to carefully mix some of the deeper clay with the over-abundant organic topsoil. This was a calculated intervention designed to address stratification on a 6-10 year cycle, accepting a short-term challenge for a long-term structural gain. The goal was to integrate, not invert—a crucial distinction for any soil diagnostician.
How to Deepen the A-Horizon by 2cm per Year Using Cover Crops?
You can actively build your valuable A-horizon downwards by approximately 2cm per year by using cover crops as a form of ‘biological drilling’. Instead of mechanical force, this method relies on selecting a diverse mix of plants whose root structures are specifically chosen to restructure the soil profile. Deep taproots from species like tillage radish or chicory act like biological subsoilers, punching through compacted layers and creating large vertical channels (macropores) that can extend 60cm or deeper. When these roots decay, they leave behind pathways for air, water, and subsequent cash crop roots to follow.
This process is complemented by fibrous-rooted species like rye or vetch. These plants create a dense, web-like network of fine roots in the upper soil layer, binding soil particles together into stable aggregates. This action is the primary defence against surface sealing and slaking. The combination is powerful: the fibrous roots condition the topsoil while the taproots create deep channels, drawing organic matter from the surface down into the subsoil. This systematically darkens and enriches the soil profile, effectively deepening the A-horizon over time and enhancing the soil’s water-holding capacity and resilience.
This paragraph introduces the concept of using cover crops for soil structuring. The illustration below provides an intimate view of how different root systems work together to penetrate and condition the soil profile.
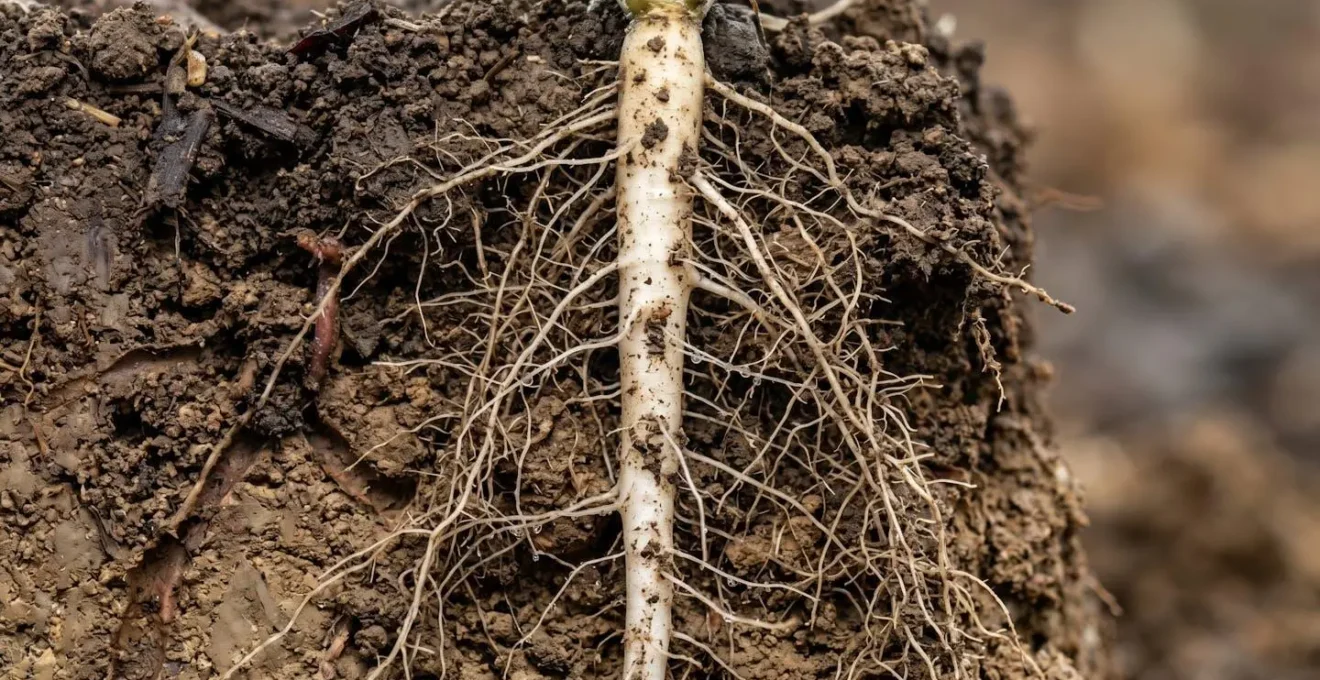
As you can see, the synergy between thick taproots and fine fibrous roots creates a comprehensive, three-dimensional network. This biological architecture is far more complex and stable than anything that can be created with steel alone. It builds a soil that is both porous and resilient, capable of absorbing heavy rainfall and supporting healthy plant growth.
Your Action Plan: UK-Specific Cover Crop Selection
- Define Objective: First, clarify your primary goal. Is it nitrogen fixation, breaking up a plough pan, controlling erosion, or mining nutrients from deeper layers? Your answer determines the species mix.
- Match to Soil Type: Select species based on your specific UK soil. For heavy Midlands clays, use deep-rooting chicory and phacelia. For light, sandy Breckland soils, opt for fibrous-rooted rye and vetch combinations.
- Time Your Sowing: Exploit warm, moist soil for rapid establishment by sowing cover crops from August to mid-September, immediately following early-harvested cash crops.
- Use Diverse Mixtures: Combine shallow fibrous roots (rye, vetch) to condition topsoil with deep taproots (tillage radish, chicory) to create a comprehensive root network that improves the entire soil profile.
- Plan Termination: Terminate cover crops at least three weeks before establishing the next cash crop. According to an AHDB guide on cover crops, the method used should be appropriate for your soil and weather to maximize organic matter incorporation.
Subsoiling vs Keyline Plowing: Which Better Aerates the B-Horizon?
Choosing between subsoiling and keyline plowing depends entirely on your diagnosis of the B-horizon’s problem; they are different tools for different jobs. Subsoiling is a targeted, brute-force intervention designed to shatter a specific, deep, and highly compacted layer like a plough pan. A conventional subsoiler uses a long, vertical tine to lift and fracture this dense pan, creating vertical fissures that allow air and water to penetrate downwards. It is the right tool when you have identified a distinct, impermeable layer at depth that is acting as a barrier to root growth and drainage.
Keyline plowing, in contrast, is a more holistic landscape-shaping technique developed by P.A. Yeomans. It is less about shattering a deep pan and more about improving overall soil aeration and, crucially, managing water flow across a slope. A keyline plough uses a thinner, shorter shank that is pulled along the contours of the land in a specific pattern that moves water from wetter valleys to drier ridges. Its primary function is to create a network of shallow, non-inverting channels that increase water infiltration and gently aerate the upper B-horizon across the entire field, not just in one deep line. It is a system for rehydrating and revitalizing a landscape.
So, which is better for aerating the B-horizon? If your diagnosis reveals a thick, isolated plough pan at 40cm, a subsoiler is the appropriate surgical tool. However, if your goal is broader—to increase water infiltration across a whole hillside, relieve moderate compaction in the upper B-horizon, and build long-term soil health and moisture resilience—then keyline plowing is the superior strategic system. One is a corrective fix; the other is a regenerative design. An effective soil diagnostician knows when to reach for the scalpel and when to implement a whole-body therapy.
The Color Change in Subsoil That Indicates Anaerobic Danger
One of the most powerful diagnostic skills you can develop is the ability to read your subsoil’s colour, as it tells a clear story about oxygen levels and waterlogging. A healthy, well-aerated B-horizon typically has a uniform brown, reddish, or yellowish colour due to the presence of oxidised iron (ferric iron). However, when soil becomes waterlogged for extended periods, oxygen is depleted, and anaerobic bacteria take over. They use iron in their respiration, chemically reducing it to its ferrous form. This process, known as gleying, strips the colour from the soil.
The first and most obvious warning sign is the appearance of a solid grey or blue-grey colouration in the subsoil. Dig a pit to 30-50cm and look for these patches. A uniform grey indicates prolonged, severe waterlogging and a lack of oxygen—a toxic environment for most crop roots. If you see this, you have a serious drainage problem that must be addressed. According to research from institutes like the James Hutton Institute on gley soils, this condition directly limits nutrient availability and root development.
Another crucial indicator is mottling. This appears as a pattern of rusty orange or red speckles and streaks within the grey gleyed soil. Mottling signals a fluctuating water table, where the soil is waterlogged for part of the year and then dries out. The grey areas are where iron is reduced, and the orange patches are where oxygen has managed to re-enter through old root channels or cracks, re-oxidising the iron. While better than solid grey, mottling still indicates seasonal anaerobic stress. Finally, the most severe sign is a greenish-blue colour or black, slimy layers, which suggest the accumulation of toxic compounds. An early olfactory test can also be decisive: the smell of hydrogen sulfide (rotten eggs) is a definitive sign of anaerobic activity, often detectable even before major colour changes are visible.
When to Subsoil: The Moisture Window You Must Respect to Avoid Smearing
Subsoiling at the wrong soil moisture is not just ineffective; it’s actively destructive, costing you yield for years to come. There is a critical ‘moisture window’ where the soil is dry enough to shatter but not so dry that it requires excessive force. If the soil is too wet, the immense pressure of the subsoiler tine doesn’t fracture the soil. Instead, it moves through it like a knife through clay, compacting the soil on either side and plastering the sides of the channel. This creates a smooth, shiny, impermeable layer known as a smear pan or glazing, which can reduce water infiltration by 60-80% and is often worse than the original compaction.
To avoid this costly error, you must become an expert in judging soil friability at your target depth. The single most effective on-farm method is the Shatter Test. Dig a pit to the depth you plan to subsoil and carefully extract a spadeful of soil as a single clod. Hold it at waist height and drop it onto a hard surface. If the soil is at the correct moisture, it will shatter cleanly into multiple smaller fragments. If it deforms, flattens, or stays largely intact, it is too wet, and you must wait. Subsoiling under these conditions will absolutely cause smearing. Stop immediately if you see a shiny groove forming behind the subsoiler leg.
This paragraph explains the critical importance of timing for subsoiling. The image below dramatically captures the ideal outcome of the ‘Shatter Test’—a clear sign that the soil is ready.
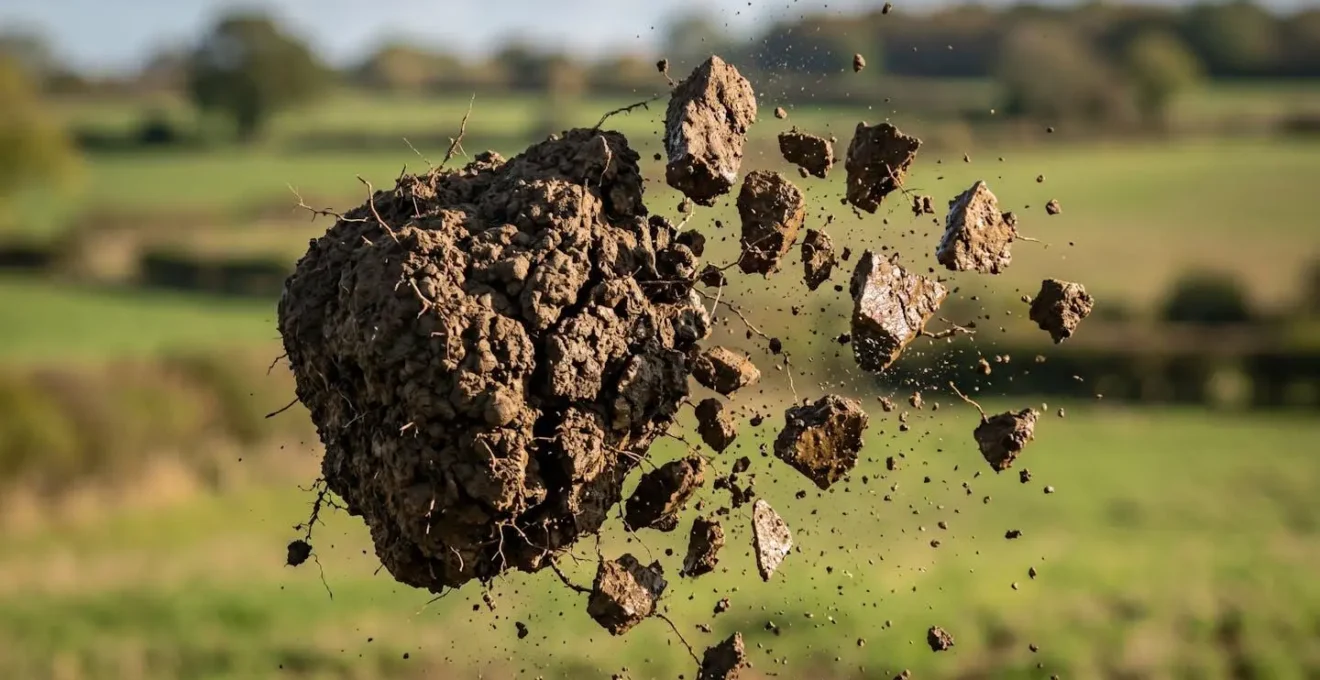
This clean fracture is what you are looking for. It indicates that the force of a subsoiler will propagate through the soil, creating a network of fissures rather than a compacted channel. Regional timing is also key. According to DEFRA’s guidance on soil management plans, free-draining soils like those in Herefordshire might be ready in late summer, whereas heavy Weald or Midlands clays often present their best window during a rare frost-hardened period in winter or a dry spell in late spring. Getting this timing wrong can result in yield losses of 20-30% for up to five years, making the moisture window a multi-thousand-pound decision.
Why Slaking Happens and How It Seals Your Soil Surface?
Slaking is the rapid breakdown of soil aggregates when they are hit by water, and it’s a primary cause of surface sealing or ‘capping’ on vulnerable UK soils. In a healthy soil, aggregates are bound together by biological glues, primarily from bacteria, fungal hyphae, and root exudates. These stable aggregates create a porous structure that allows rainwater to infiltrate. However, in soils with low organic matter or poor biological activity, these aggregates are weak. When a heavy raindrop strikes, the force shatters the aggregate. The clay and silt particles are thrown into suspension in the water and then settle as a fine, dense layer as the water soaks in, effectively sealing the soil surface.
This surface seal is disastrous for several reasons. First, it dramatically reduces water infiltration, leading to ponding and increased surface runoff—a major driver of erosion on sloping fields. This is a growing concern, as UK parliamentary research indicates an increase in surface water runoff from greater winter rainfall. Second, it creates an almost impenetrable barrier for emerging seedlings, leading to poor crop establishment and potentially requiring costly re-drilling. Third, it starves the soil profile of oxygen, leading to the anaerobic conditions discussed earlier.
You can easily test your soil’s vulnerability to slaking with two simple DIY tests. For the Slake Test, collect a few dry soil aggregates from a field and gently place them on a mesh screen in a jar of water. A stable aggregate from a healthy pasture or no-till field will remain intact for many minutes. An unstable aggregate from a heavily tilled field will disintegrate almost instantly, clouding the water. The Jar Test takes this further: shake the jar vigorously and let it settle for 24 hours. A healthy soil will have clearer water and distinct sediment layers, while a poor soil will remain cloudy. These tests provide a stark visual diagnosis of your soil’s structural integrity and its ability to withstand the UK’s increasingly intense rainfall events, which are particularly damaging on bare post-harvest soils in regions like East Anglia.
How to Construct Swales to Capture Runoff on Hill Farms?
Constructing swales on hill farms is a powerful engineering intervention to capture, slow, and infiltrate runoff, but success requires navigating UK-specific regulations and funding. A swale is essentially a shallow ditch with a raised bank (a berm) on the downslope side, excavated perfectly on contour. Its job is not to drain water away, but to hold it, allowing it to slowly soak into the soil profile, rehydrating the landscape and stopping erosion in its tracks. A typical swale might be 30-60cm deep and 1-2 meters wide, with swales spaced 15-30 meters apart depending on the steepness of the slope.
From a regulatory standpoint, the good news is that smaller swales (under 10,000 cubic meters capacity) generally do not require approval from the Environment Agency in the UK. However, you must be mindful of Public Rights of Way, ensuring any swale construction respects access and does not impede drainage onto paths. The real opportunity lies in smart funding. A « grant stacking » strategy can make these projects highly cost-effective. You can potentially combine a Countryside Stewardship capital grant with ongoing payments from the Sustainable Farming Incentive (SFI).
For example, you could use SFI payments for planting the swale berms with diverse wildflower mixes (IPM3) or nitrogen-fixing legumes (NUM3), adding ecological and fertility benefits on top of the water management function. This integrated approach turns a simple earthwork into a multi-functional farm asset. The power of this technique when applied at a landscape scale is undeniable.
Case Study: The Pontbren Project, Wales
The highly influential Pontbren Project in the Welsh uplands provided compelling proof of concept. A group of farmers worked together to implement strategic tree planting and on-contour swales across just 5% of their hill farm catchment area. The result was a staggering 40% reduction in peak flood flows downstream. This collaborative project demonstrated that on-farm water management not only drastically reduces flood risk but also improves on-farm water retention, boosting grassland productivity during dry spells. It has since become a key model for upland water management in UK agri-environment policy.
Key takeaways
- Your spade is your most important diagnostic tool. Dig pits and learn to read the colour, smell, and structure of your soil horizons.
- The goal of cultivation should be integration, not inversion. Never bury your biologically active A-horizon.
- Timing is everything. Subsoiling in wet conditions is actively destructive; learn to master the « shatter test » to find the perfect moisture window.
- Build multi-layered defence systems. A single intervention is fragile; a combination of agroforestry, swales, and soil health practices creates true resilience.
Designing Climate-Smart Systems to Buffer Extreme Rainfall Events in the North?
To truly future-proof farms in the North of England and other upland areas, we must move beyond single interventions and design integrated, climate-smart systems that buffer against predicted increases in extreme rainfall. Met Office UKCP18 climate projections show a clear trend towards greater winter rainfall and more intense, short-duration downpours. A farm’s resilience will depend on its ability to slow, spread, and sink this water across the entire landscape, rather than letting it concentrate and accelerate down slopes.
A highly effective approach is a multi-layered water management system that works synergistically at different scales. This system, promoted by organisations like the Soil Association, is built on three key layers:
- Layer 1 – Agroforestry Belts: Planting tree belts on contour is the first line of defence. The canopy intercepts 60-80% of raindrop impact energy, preventing surface slaking, while the deep roots of species like alder and oak physically bind the soil and create deep infiltration channels.
- Layer 2 – Contour Swales: Immediately upslope of the tree belts, construct on-contour swales. These capture any runoff that does occur, holding it and allowing it to infiltrate, directly watering the tree roots and recharging soil moisture. The trees, in turn, stabilise the swale berms.
- Layer 3 – Leaky Dams: In existing ditches and gullies where water inevitably concentrates, install simple leaky dams using logs or stones. These structures don’t block water but slow it down, reducing its erosive power, forcing sediment to drop out, and reducing peak flows in watercourses by 30-50%.
Implementing such a system is most powerful when done collaboratively. Joining or forming a local Farmer Cluster, like those in Cumbria or Northumberland, allows for shared costs, coordinated action across farm boundaries, and a far greater impact on reducing downstream flood risk. This is not just about soil conservation; it is about proactive landscape engineering in the face of a changing climate, transforming your farm into a resilient sponge rather than a vulnerable channel.
The ultimate goal is to shift your mindset from fighting water to farming it. By becoming a ‘soil diagnostician’ and implementing these integrated systems, you are not just preventing topsoil loss; you are building a more profitable, resilient, and ecologically sound farm that can thrive in the face of the UK’s evolving climate challenges.